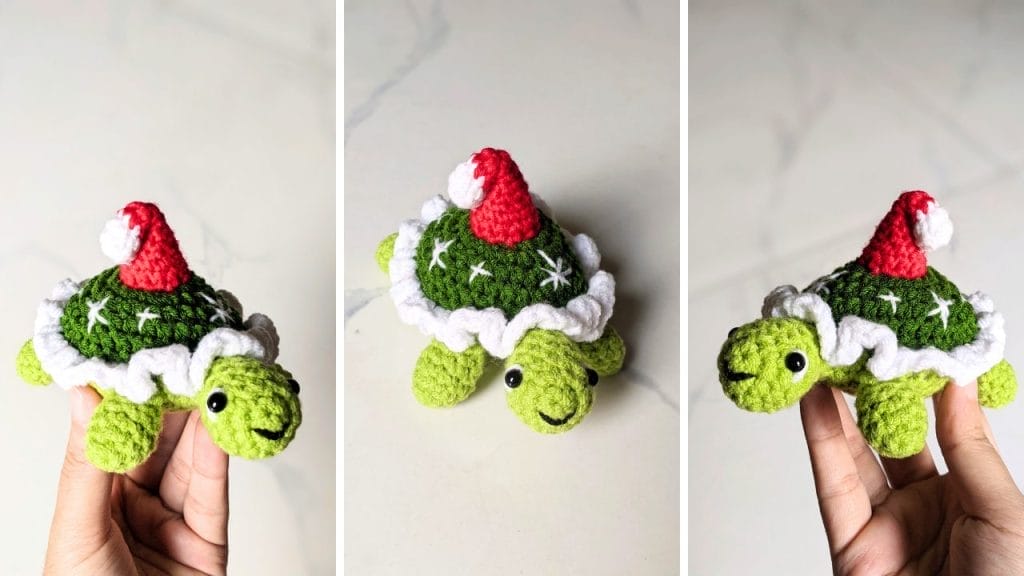
Adorable Sunflower Turtle Amigurumi: Free Crochet Pattern

This post was created with help from AI tools and carefully reviewed by a human (Muntaseer Rahman). For more on how we use AI on this site, check out our Editorial Policy.
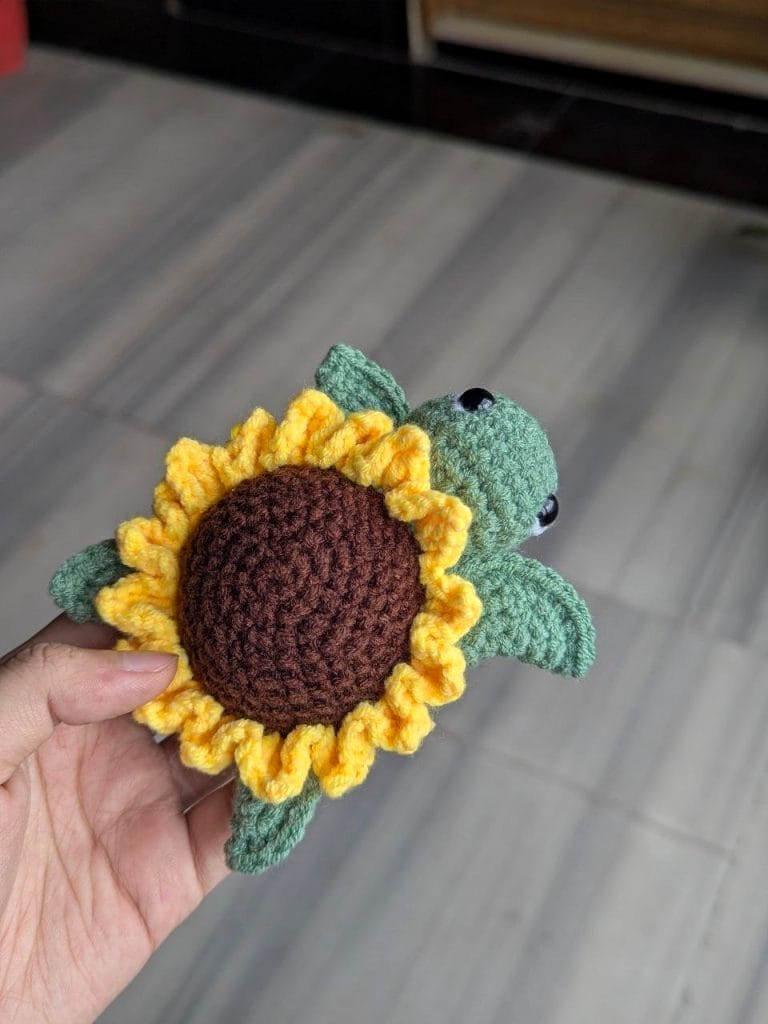
There’s something absolutely magical about combining the charm of a gentle turtle with the bright cheerfulness of a sunflower.
This delightful amigurumi pattern creates a unique little companion that’s sure to bring smiles wherever it goes.
Unlike many basic turtle patterns you’ll find online, this sunflower turtle features beautiful yellow petals that crown the shell, creating a stunning 3D flower effect.
The pattern was developed by an experienced crochet designer and tested to ensure clear, achievable results.

What Makes This Pattern Special
This isn’t just another turtle pattern. The sunflower shell design sets it apart with its layered petals and realistic texture. The combination of techniques used here will help you develop skills in:
- Working with multiple yarn colors seamlessly
- Creating dimensional flower petals
- Proper stuffing techniques for shaped pieces
- Professional finishing methods
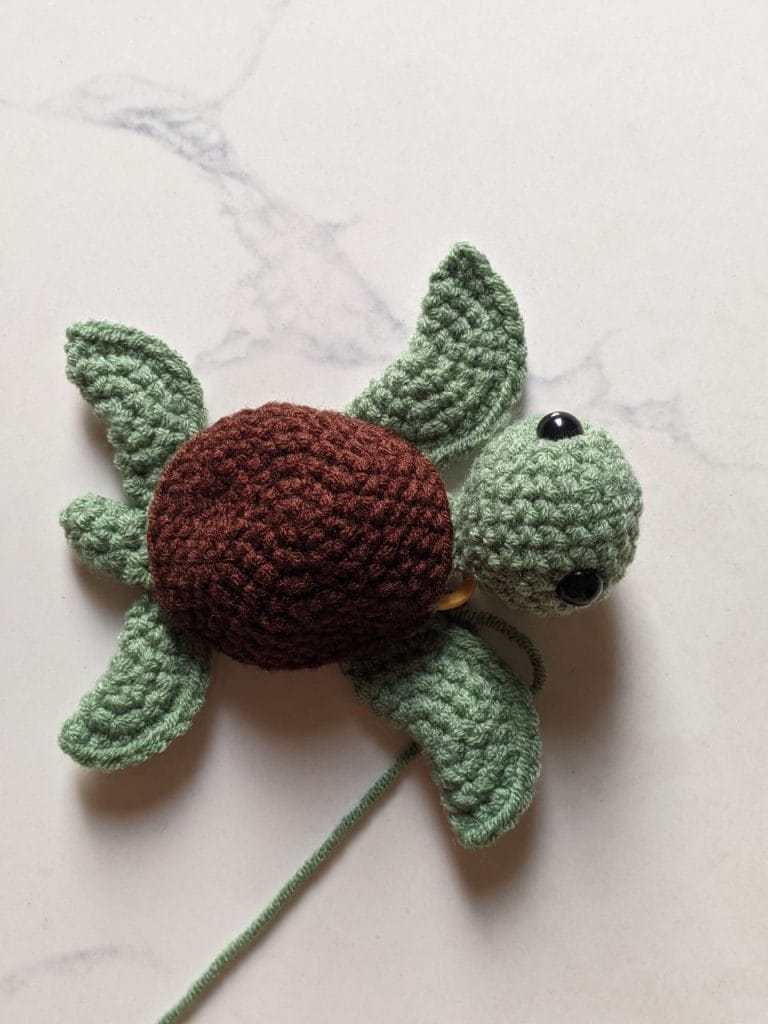
The finished turtle measures approximately 5 inches (12 cm) and makes a perfect gift, nursery decoration, or addition to any amigurumi collection.
Pattern Details
Skill Level: Intermediate
This pattern requires familiarity with basic crochet stitches (such as single crochet, increase, and decrease), working in the round, and attaching multiple parts together.
If you’re comfortable making basic amigurumi animals, you’ll be able to tackle this project successfully.
Finished Size: Approximately 12 cm (5 inches)
Note: Size may vary depending on yarn thickness, hook size, and your individual tension.
Your Yarn Stash Called. It Wants to Be a Turtle.

Look, you could spend another weekend scrolling Pinterest for the “perfect” turtle pattern.
Or you could grab one that’s already perfect.
Turt-ally Hooked gives you 5 complete turtle patterns—each with a different theme, personality, and skill level.
Bee, strawberry, sunflower, Christmas, and cupcake. All adorable. All doable.
It’s straightforward, it’s cute, and if you’ve been meaning to make something other than another scarf—here’s your chance.
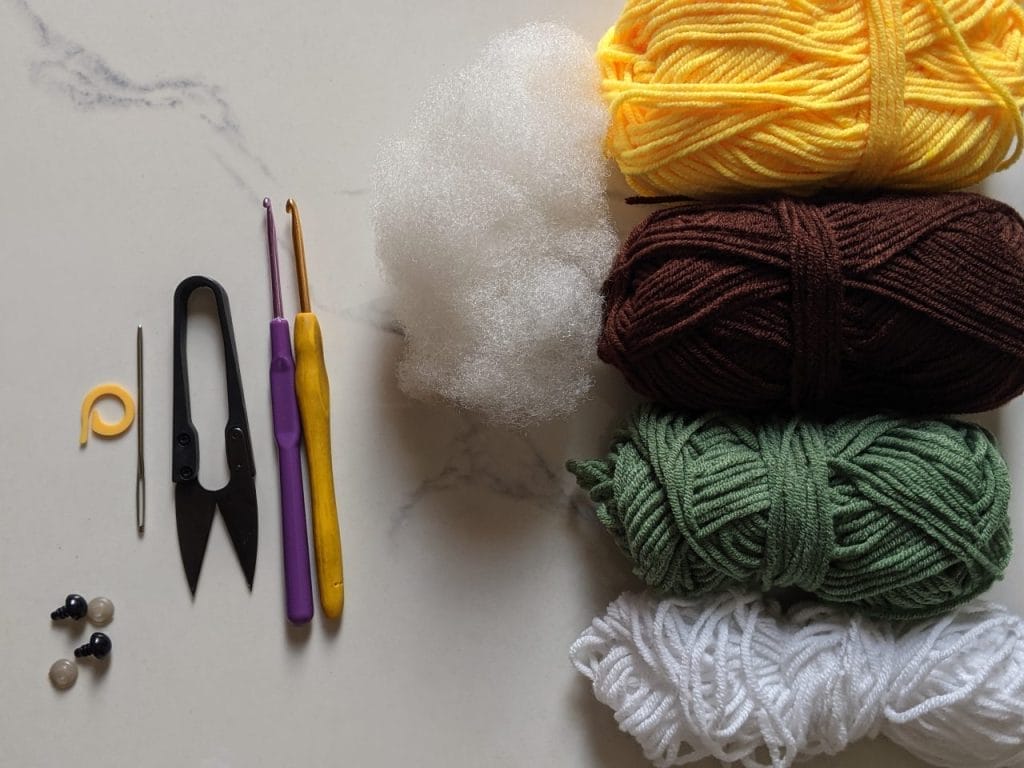
Materials Needed
Yarn:
Milk cotton yarn (4ply) in:
- Dark brown (for the shell center)
- Light green (for body parts)
- Yellow (for sunflower petals)
- Black (for embroidered details)
- White (for eye highlights)
Tools:
- 3.0 mm crochet hook (for flower petals)
- 3.5 mm crochet hook (for all other parts)
- 8 mm safety eyes (or small black beads as alternative)
- Fiberfill stuffing
- Tapestry needle
- Sharp scissors
Pro Tip: Using milk cotton yarn gives this turtle a soft, cuddly texture that’s perfect for handling. If you can’t find milk cotton, any worsted weight cotton yarn will work beautifully.
Essential Abbreviations
Before we begin, familiarize yourself with these standard crochet abbreviations:
- MR = Magic Ring
- ch = Chain
- sc = Single Crochet
- inc = Increase (2 sc in one stitch)
- dec = Decrease (2 sc together)
- sl st = Slip Stitch
- R = Round/Row
- BLO = Back Loop Only
- FLO = Front Loop Only
- dc = Double Crochet
- tr = Treble Crochet
Step-by-Step Instructions
Upper Shell (Dark Brown Yarn)
The shell forms the foundation of our sunflower turtle, so take your time to maintain even tension throughout.
R1: 6 sc in MR [6]
R2: 6 inc [12]
R3: (1 sc, 1 inc) × 6 [18]
R4: (2 sc, 1 inc) × 6 [24]
R5: (3 sc, 1 inc) × 6 [30]
R6: sc around [30]
R7: (4 sc, 1 inc) × 6 [36]
R8: sc around [36]
Fasten off and weave in the end.
Important: Don’t stuff the upper shell yet. We’ll be working into specific loops later for the petals and bottom attachment.

Head (Light Green Yarn)
The head should be nicely rounded and proportional to the shell size.
R1: 6 sc in MR [6]
R2: 6 inc [12]
R3: (1 sc, 1 inc) × 6 [18]
R4: (2 sc, 1 inc) × 6 [24]
R5–R8: sc around [24]
Eye Placement: Insert safety eyes between rounds 5–6, spacing them 7 stitches apart. This creates the perfect sweet expression.
Stuff the head lightly but firmly. You want it to hold its shape without being overpacked.
R9: (2 sc, 1 dec) × 6 [18]
R10: (1 sc, 1 dec) × 6 [12]
R11: 6 dec [6]
Fasten off and weave in the end.
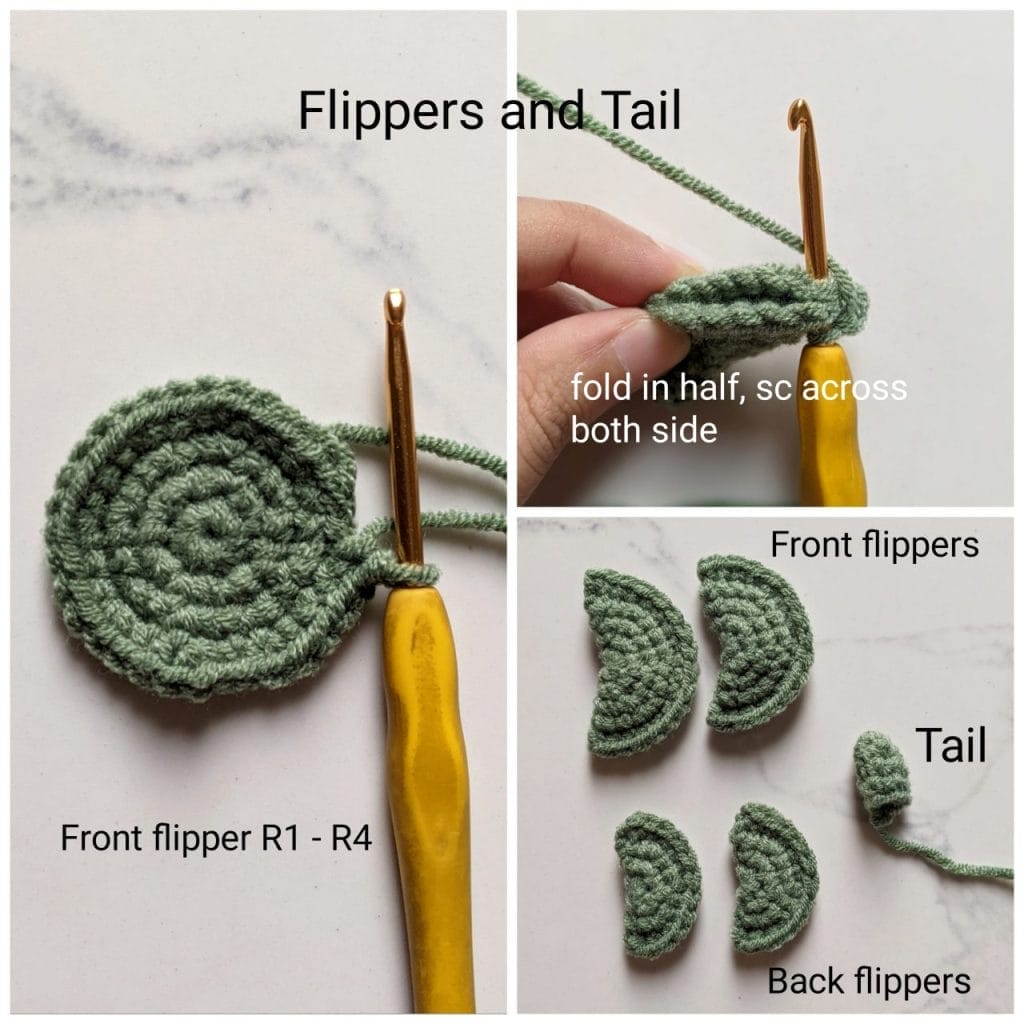
Front Flippers (Make 2, Light Green Yarn)
The front flippers are larger and help give the turtle its characteristic pose.
R1: 8 sc in MR [8]
R2: 8 inc [16]
R3: (1 sc, 1 inc) × 8 [24]
R4: (2 sc, 1 inc) × 8 [32]
Fold the circle in half and work 16 sc across both layers to create the flipper shape. This technique creates a natural flat flipper without any bulk.
Fasten off and weave in the end.
Back Flippers (Make 2, Light Green Yarn)
The back flippers are slightly smaller than the front ones.
R1: 8 sc in MR [8]
R2: 8 inc [16]
R3: (1 sc, 1 inc) × 8 [24]
Fold in half and work 12 sc across both layers. Do not stuff these pieces.
Fasten off and weave in the end.
Tail (Light Green Yarn)
A small but important detail that completes the turtle’s silhouette.
R1: 6 sc in MR [6]
R2–R4: sc around [6]
Fasten off and weave in the end.
Bottom Shell Assembly (Light Green Yarn)
This is where the magic happens! We’ll attach all the body parts while creating the bottom of the shell.
Attach your light green yarn to the back loops only (BLO) of Round 8 of the upper shell.
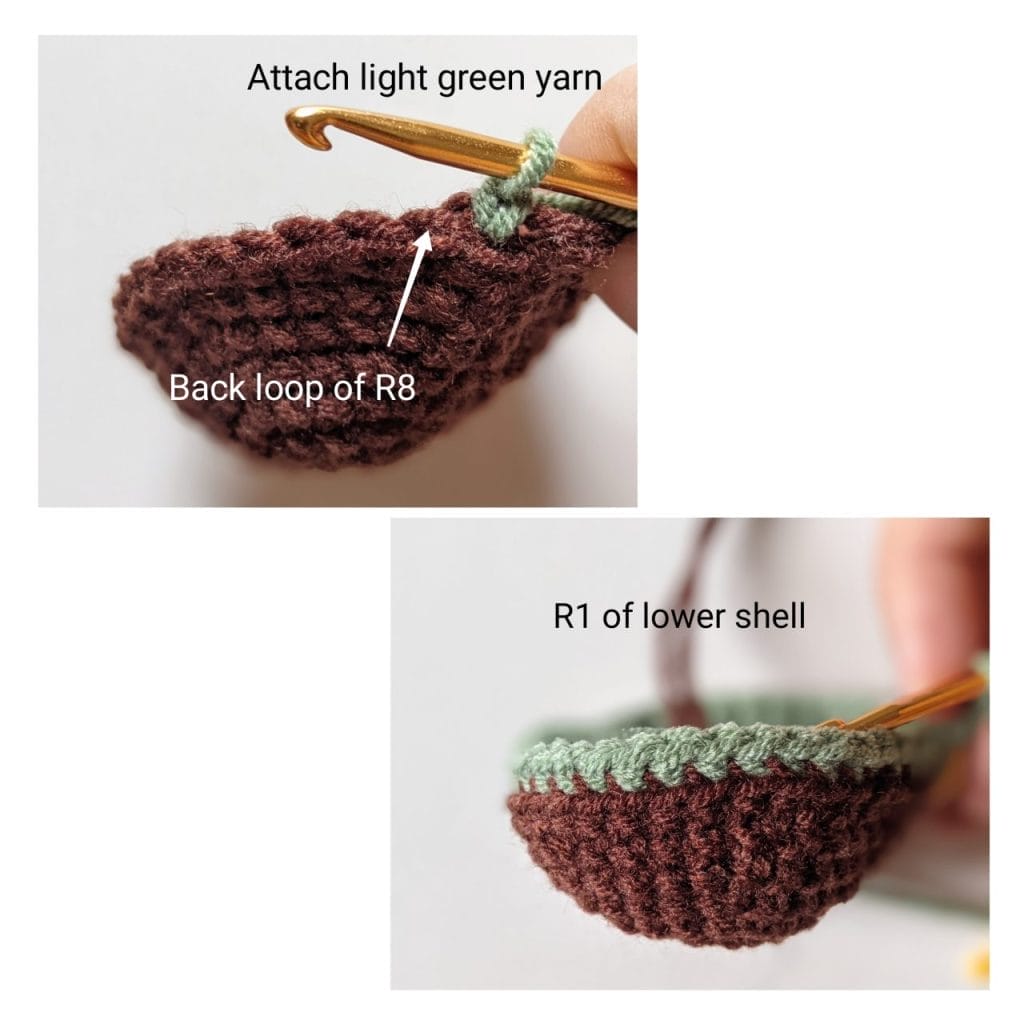
R1: Working in BLO, sc around [36]
R2: This is the attachment round. Place each body part (head, flippers, tail) outside the shell as you work. Insert your hook through the body part first, then through the shell stitch, and complete the single crochet.

Following this sequence:
- 2 sc (regular stitches)
- Attach head with 3 sc
- 2 sc (regular stitches)
- Attach front flipper with 4 sc
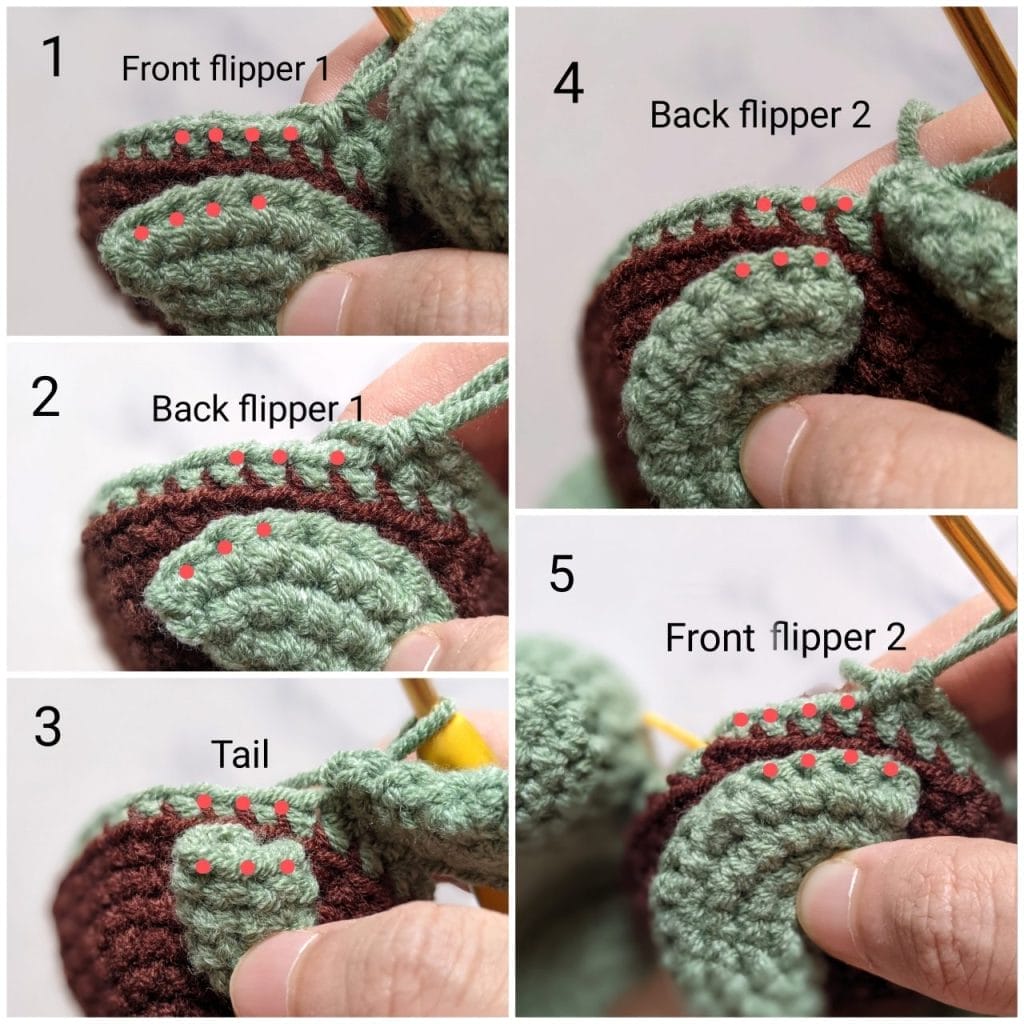
- 6 sc (regular stitches)
- Attach back flipper with 3 sc
- Attach tail with 3 sc
- Attach second back flipper with 3 sc
- 6 sc (regular stitches)
- Attach second front flipper with 4 sc
Total: [36] stitches

R3: (2 sc, 1 dec, 2 sc) × 6 [30]
R4: (3 sc, 1 dec) × 6 [24]
R5: 12 dec [12]
Stuffing Time: Fill the body cavity with fiberfill, making sure not to overstuff.
R6: 6 dec [6]
Fasten off, then close the gap by weaving through the front loops only of the remaining 6 stitches. Pull tight to close and hide the tail.
Sunflower Petals (Yellow Yarn, Use 3.0 mm Hook)
Now for the show-stopping feature! Switch to your smaller 3.0 mm hook for more defined petals.
Attach yellow yarn to the front loops only (FLO) of Round 8 of the upper shell.
Work around the shell, repeating this petal pattern: ch 2, (1 dc, 1 tr, peacock stitch, 1 tr, 1 dc) in the next st, ch 2, sl st in the next st
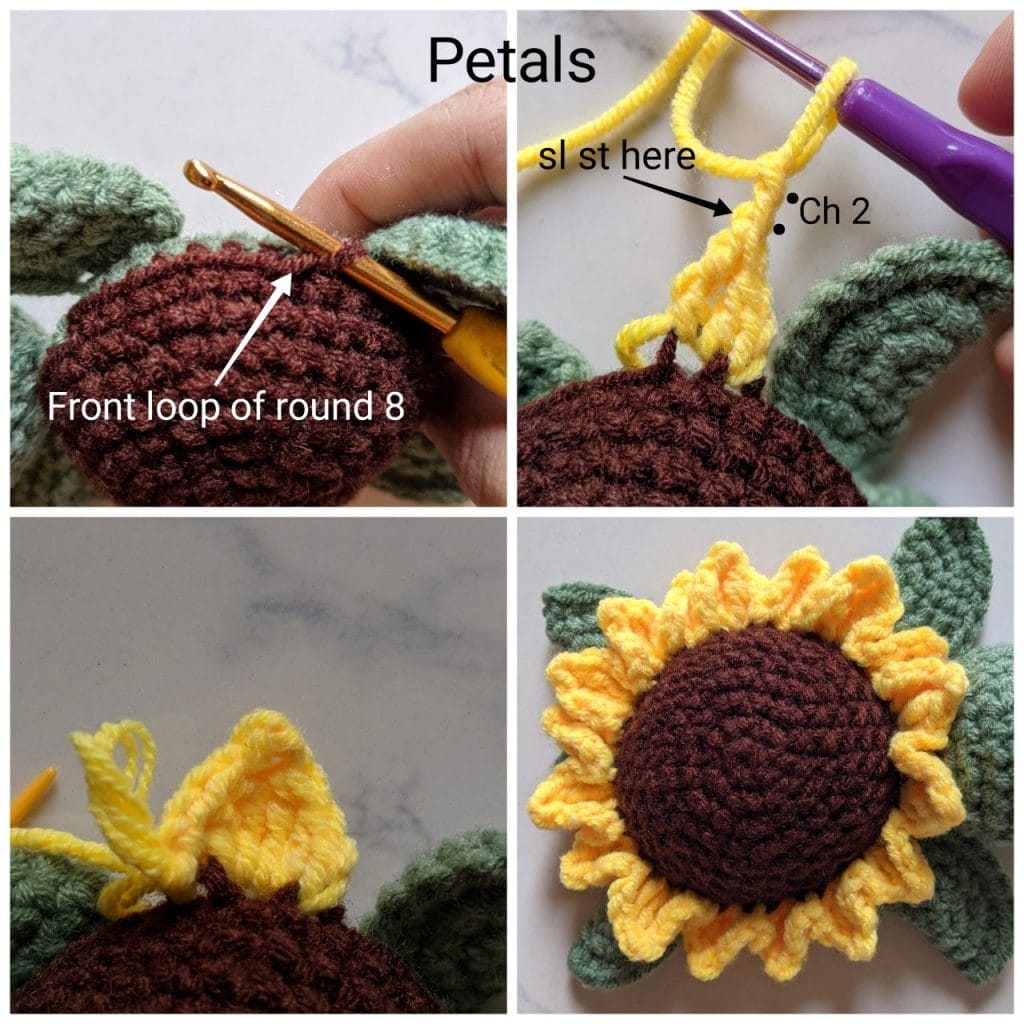
Peacock Stitch Technique: ch 2, sl st into the back bump of the first ch. This creates a lovely pointed petal tip.
Continue this pattern all the way around the shell to create a full ring of sunflower petals.
Fasten off and weave in the end.

Finishing Touches
The small details make all the difference:
- Embroider a sweet smile using black yarn. Place it slightly below and between the eyes for the most natural look.
- Add eye highlights with tiny stitches of white yarn on each safety eye. This brings the turtle to life!
- Shape the petals gently with your fingers to create dimension and natural curves.
Pro Tips for Success
Tension Matters: Keep your stitches consistent, especially on the shell. Uneven tension will show in the final shape.
Safety Eye Placement: Take time to position the eyes correctly before pushing the backing through. It’s nearly impossible to adjust them once secured.
Stuffing Technique: Add stuffing gradually. It’s easier to add more than to remove excess.
Petal Perfection: The peacock stitch might feel awkward at first, but it creates the most realistic petal points. Practice on a swatch if needed.
Troubleshooting Common Issues
Petals won’t lay flat: Make sure you’re working into the front loops only and maintaining consistent tension.
Body parts feel loose: The attachment method in R2 should create secure connections. If they feel wobbly, add a few extra securing stitches with your tapestry needle.
Head seems too small/large: This pattern is tested for proportion, but if your tension varies significantly, adjust the number of increase rounds as needed.
Creative Variations
Once you’ve mastered the basic pattern, try these fun modifications:
- Seasonal Colors: Use orange and red petals for autumn, or white and blue for winter
- Multiple Petal Layers: Create a double layer of petals for extra dimension
- Size Variations: Use different yarn weights to create a family of sunflower turtles
Final Thoughts
This sunflower turtle represents the perfect marriage of traditional amigurumi techniques with creative floral design.
The expert who developed this pattern has created something truly special that showcases intermediate crochet skills while remaining achievable for dedicated beginners.
Take your time with each step, and don’t rush the finishing details.
The combination of the textured shell, dimensional petals, and sweet facial features creates an heirloom-quality piece that will be treasured for years to come.
Whether you’re making this as a gift or adding to your own collection, this sunflower turtle is sure to become a beloved favorite.
The satisfaction of completing this intricate pattern will boost your confidence for tackling even more complex amigurumi projects in the future.
Happy crocheting!

About Author
Muntaseer Rahman started keeping pet turtles back in 2013. He also owns the largest Turtle & Tortoise Facebook community in Bangladesh. These days he is mostly active on Facebook.