Red-Eared Slider Habitat Ideas: 8 Indoor, Outdoor & DIY Tank Setups
This post was created with help from AI tools and carefully reviewed by a human (Muntaseer Rahman). For more on how we use AI on this site, check out our Editorial Policy.
Looking for red-eared slider habitat ideas that match your space, budget, and DIY skill level?
This guide covers 8 real setups, split into indoor tank ideas, outdoor habitats, and one hybrid mansion build. Whether you want a planted aquascape, a stock tank pond, or a kiddie pool on the balcony, there’s a build below you can copy.
Want the step-by-step cycling tutorial instead of just the inspiration? Read our complete guide to setting up a red-eared slider tank from start to finish.
This post focuses on the look, layout, and vibe you can copy. For setups beyond red-eared sliders, browse our wider roundup of aquatic turtle tank ideas.
What Size Tank Does a Red-Eared Slider Need?
Before you pick a habitat idea to copy, get the size right. Undersizing is the single biggest mistake new slider owners make.
Use this as your baseline:
- Hatchlings (under 4″): 20-gallon long minimum, but plan to upgrade within a year
- Juveniles (4 to 6″): 40-gallon breeder minimum
- Adult males (6 to 9″): 55-gallon minimum, 75-gallon preferred
- Adult females (8 to 12″): 75 to 125 gallons. Females grow significantly larger than males
- Rule of thumb: 10 gallons of water per inch of shell length, with surface area to swim and a dry basking zone that clears the water completely
All 8 red-eared slider habitat ideas below assume you’ve got the right size for your turtle. If you’re still at the bare-tank stage, lock in sizing first.
Quick Chooser: Which Habitat Idea Fits You?
Use this to skip ahead to the right build:
- Tightest budget or kid’s first slider: Setup #5, the kiddie pool DIY (around $50 for the structure)
- Beginner, clean indoor aesthetic: Setup #1, the minimalist driftwood tank
- Plant lover or low-light room: Setup #2, the jungle desk tank
- Showing off an albino or brightly-marked slider: Setup #3, the classic aquarium with above-tank basking
- Indoor planted aquascape build: Setup #4, the bioactive planted slider tank
- Backyard pond on a budget: Setup #6, the stock tank pond
- Predator-prone yard or full outdoor home: Setup #7, the predator-safe outdoor enclosure
- DIY builder with space and tools: Setup #8, the loft-style indoor-outdoor mansion
Structure cost ranges from about $50 (kiddie pool) to $500+ (loft mansion frame).
The real money goes into equipment. Budget $400 to 600 for filtration, UVB (my pick: Zoo Med ReptiSun 10.0), heat, and water care regardless of which habitat idea you copy.
This Hilarious Turtle Book Might Know Your Pet Better Than You Do
Let’s be real—most turtle care guides feel like reading a textbook written by a sleep-deprived zookeeper.
This one’s not that.
Told from the snarky point of view of a grumpy, judgmental turtle, 21 Turtle Truths You’ll Never Read in a Care Guide is packed with sarcasm, sass, and surprisingly useful insights.
And hey—you don’t have to commit to the whole thing just yet.
Grab 2 free truths from the ebook and get a taste of what your turtle really thinks about your setup, your food choices, and that weird plastic palm tree.
It’s funny, it’s honest, and if you’ve ever owned a turtle who glares at you like you’re the problem—you’ll feel seen.
Before You Start: Equipment Every Setup Needs
These habitat ideas look amazing, but they all run on the same core equipment. No matter which design you choose, you’ll need:
- Powerful filtration. Red-eared sliders produce massive amounts of waste. You need a canister filter (my pick: Penn-Plax Cascade) rated for 2 to 3x your tank volume minimum.
- Proper UVB lighting. A Zoo Med ReptiSun 10.0 T5 HO bulb is non-negotiable for calcium metabolism and shell health.
- Heat lamp (my pick: heat lamp). A 75 to 100W basking bulb (my pick: Zoo Med PowerSun) to create an 88 to 92°F basking surface temperature.
- Water heater. To maintain 75 to 80°F water temperature (unless your room or outdoor climate stays naturally warm).
- Quality food and calcium supplements (my pick: Rep-Cal Calcium with D3). Proper nutrition is just as important as the setup.
Check our Complete Turtle Owner Essentials guide for specific product recommendations. The structure ideas below are great, but without the right equipment, your slider won’t thrive.
Indoor Red-Eared Slider Tank Ideas
These 4 indoor builds work in apartments, living rooms, bedrooms, and home offices. All assume year-round indoor temperatures and full equipment.
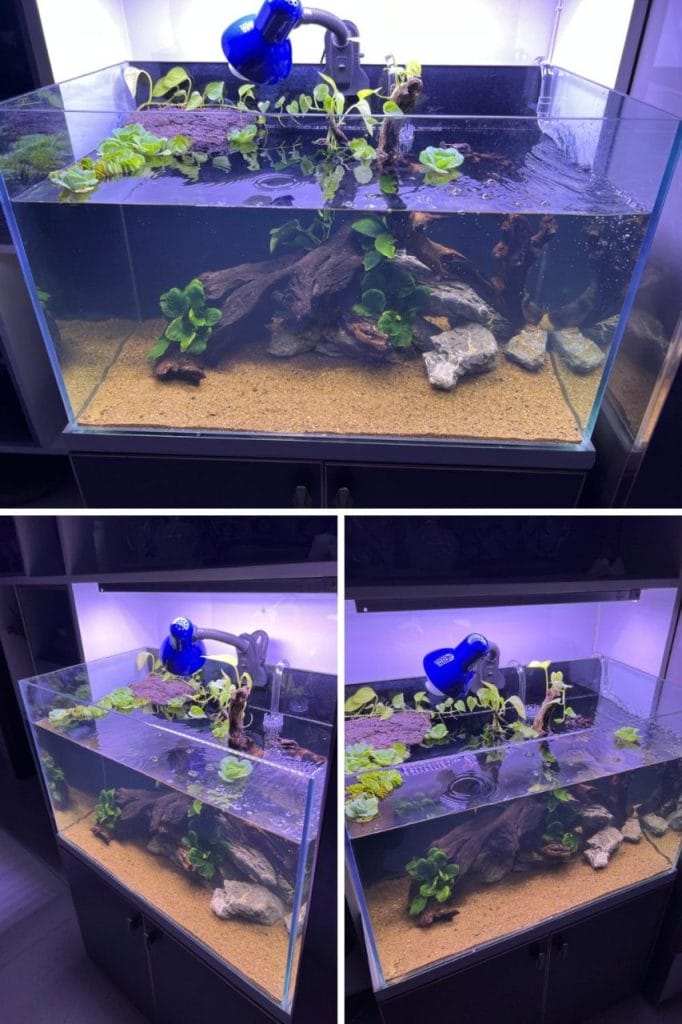
1. The Minimalist Driftwood Tank
Great for: Indoor setups, clean aesthetic, easy maintenance
This setup keeps things simple but smart. A clear tank with sandy substrate, chunks of driftwood, live floating plants, and just enough depth for your slider to swim without stress.
What stands out? That driftwood pile. It’s not just decoration. It gives cover, breaks the line of sight, and helps keep your turtle mentally active.
Plus, the floating plants help with nitrate control. The clip-on basking lamp is positioned well above the platform, which looks like cork or foam covered with moss or plants.
How to copy it:
- Use a 40-gallon or bigger glass tank
- Add soft sand at the bottom (play sand works fine)
- Stack driftwood at different angles so your turtle can rest and hide
- Toss in floating plants like water lettuce or anacharis
- Clip a UVB and heat lamp over a floating dock or suction-cup basking platform (my pick: floating basking platform)
(See our recommended UVB bulbs and fixtures. Not all UVB lights work properly for turtles.)
This one’s perfect if you want something that looks clean but gives your turtle a natural, cozy feel.

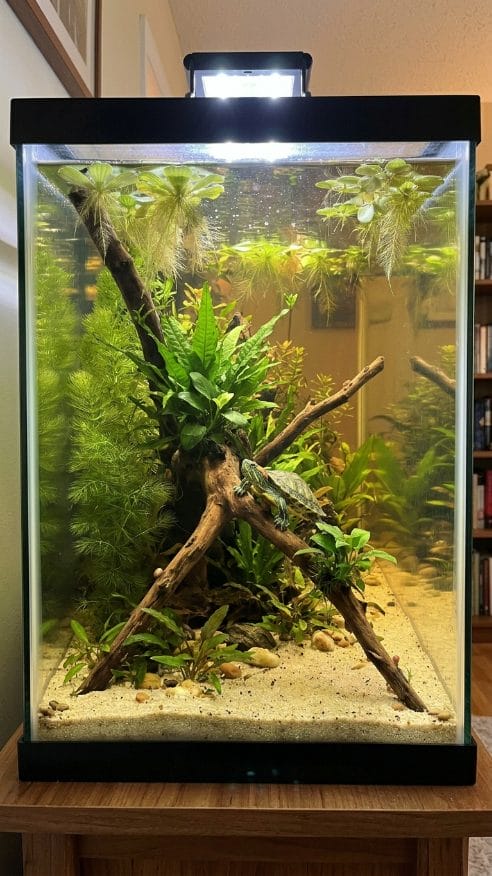
2. The Jungle Desk Tank
Great for: Low-light rooms, plant lovers, cozy vibes
This one’s got that moody, lived-in look. It sits right on a desk by the window with thick plant growth inside.
The water is darker, filtered by tannins and plant roots. It almost feels like a rainforest swamp.
There’s driftwood, submerged plants, and maybe even some hiding fish in there. A basking lamp hangs from a clamp light, giving your turtle a warm sunspot near the surface.
How to copy it:
- Get a long tank, at least 40 gallons
- Add plenty of low-light aquatic plants like Java fern, hornwort, or Anubias
- Mix in driftwood and mosses to create that shadowy look
- Clamp a basking light on the side of your desk, pointing at a basking platform
- Let natural window light add a warm touch (but still use UVB)
Window light doesn’t provide UVB through glass. You must use an artificial UVB bulb. Our lighting guide explains proper positioning.
This one is for cozy setups in small rooms. It’s also great if you like watching your turtle explore a wild-looking environment.
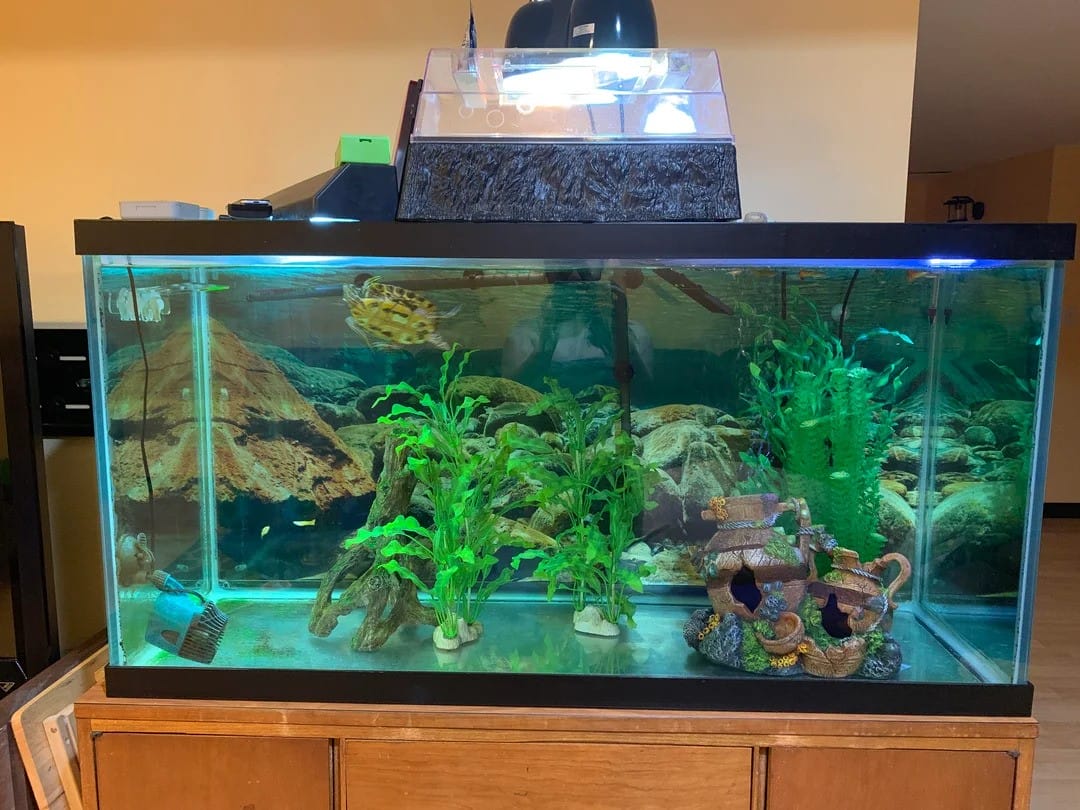
3. The Classic Aquarium With Above-Tank Basking
Great for: Albino red-eared sliders, clean water setups, indoor living rooms
This one’s clean, crisp, and perfect for showing off a bright-colored slider like an albino red-eared slider.
The tank is decorated with artificial plants and driftwood, but the best part is the basking dock that sits above the tank.
That gives the turtle full water depth to swim while still having a dry spot under the heat and UVB lights. Plus, it keeps things looking sharp. No floating docks blocking the view.
How to copy it:
- Use a large aquarium (at least 55 gallons)
- Add medium-flow filters to keep the water spotless
- Decorate with fake plants and caves for a pop of color
- Build or buy an above-tank basking platform (ATBA)
- Place your UVB and heat lamps right on top of the platform
For a 55+ gallon turtle tank, you need serious filtration. See our filter recommendations for options that actually work.
If you’ve got an albino red-eared slider, this is the setup that shows them off best without stressing them out.
4. The Bioactive Planted Slider Tank
Great for: Aquascape lovers, low-maintenance water, planted-tank crossover hobbyists
This is the build for people who want a planted aquarium that also happens to house a slider. Think low-light carpet plants, dense rooted stems, and a clean white sand foreground.
The trick is choosing plants tough enough to survive a slider’s claws and appetite. Java fern, Anubias barteri, hornwort, and Amazon sword tied or weighted to driftwood and rocks can all hold up.
Floating plants like water lettuce and frogbit get nibbled, but they regrow fast and pull nitrates out of the water. That means longer gaps between water changes.
How to copy it:
- Use a 75-gallon long tank for adult sliders (planted tanks need horizontal swim space)
- Lay 1 to 2 inches of inert substrate (pool filter sand or fluorite black) since deep planted soil fouls fast under turtles
- Anchor Anubias and Java fern to driftwood with thread or super glue gel
- Add a thick mat of hornwort and water lettuce on top for shade and nitrate control
- Use a strong canister filter (2 to 3x tank volume) and skip CO2 injection (too risky with a turtle)
- Place the basking dock against a back corner so it doesn’t shade the planted zone
Sliders will uproot anything you bury, so attach plants to hardscape instead of substrate. For a deeper look at what works, read our guide on live plants in turtle tanks.
This setup looks amazing once it grows in, but it’s not a beginner build. Expect to replace nibbled plants every few months.
Outdoor Red-Eared Slider Habitat Ideas
These 3 outdoor builds work in warm climates or seasonal warm months. All require predator-safety, shade access, and a way to bring the turtle indoors when temperatures drop below 65°F.
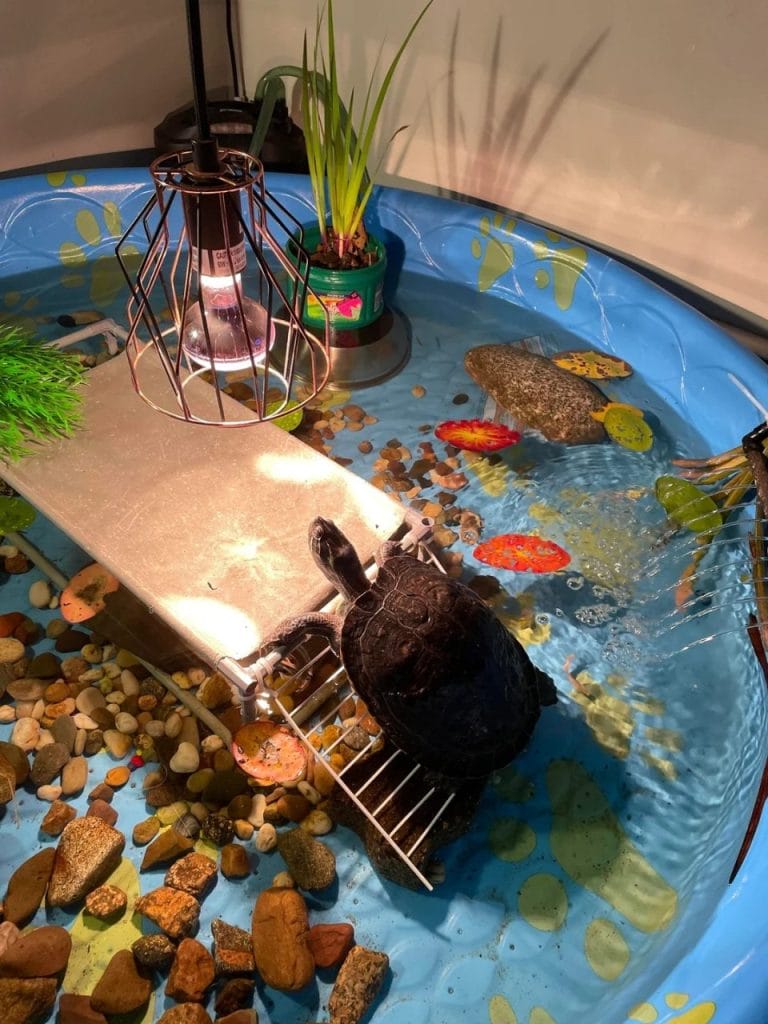
5. The Kiddie Pool Backyard Special
Great for: Outdoor setups, budget builds, giving turtles natural sunlight
This is peak DIY. A basic kiddie pool turned into a turtle paradise.
It’s got natural rocks, scattered gravel, some pond plants, and a metal basking ramp under a heat lamp. It’s playful, cheap, and surprisingly effective.
The turtle has enough room to swim around, and the setup can go indoors or on a balcony if you don’t have a yard.
How to copy it:
- Grab a hard-plastic kiddie pool (not inflatable. Turtle claws puncture vinyl in minutes)
- Add a layer of gravel and flat stones for texture and hiding spots
- Use a metal cooling rack or DIY ramp with zip ties for basking
- Place a plant in a weighted pot for that natural vibe
- Hang a heat and UVB bulb over the basking ramp using a clamp lamp with a cage guard
- Cover the pool with hardware cloth or wire mesh when unsupervised to keep predators out
You’ll need separate bulbs for heat and UVB. Our basking equipment section covers exactly what wattage you need.
If your turtle could write a thank-you note, it would.

6. The Stock Tank Pond
Great for: Mid-budget outdoor builds, semi-permanent setups, fenced backyards
A galvanized stock tank (the 100 to 150-gallon size used for livestock) makes one of the cleanest outdoor pond builds you can get without digging into your yard.
It sits above ground, holds shape forever, and gives your slider real swim depth (18 to 24 inches) plus enough surface area for natural sun-basking.
You add a pond pump, a basking platform, and a few aquatic plants in pots, and the result looks half-natural, half-sculpted.
How to copy it:
- Use a 100 to 150-gallon galvanized stock tank (Tractor Supply sells them for under $200)
- Set it on level ground in a spot that gets 4 to 6 hours of direct morning sun
- Drop in a pond pump or external pressurized filter rated 2x the volume
- Build a basking ramp from flat stacked stones or a floating wood platform
- Add water hyacinth, water lettuce, or hornwort in weighted pots
- Top with a hinged hardware-cloth lid for predator protection
Don’t seal the bottom or bury it. Above-ground stock tanks let you drain and clean them in 15 minutes with a siphon pump.
This setup gives sliders the best thing money can buy: real, unfiltered sunlight on their shell. Just make sure you can bring them inside when nights drop below 65°F.
7. The Predator-Safe Outdoor Enclosure
Great for: Permanent outdoor sliders, multi-turtle households, raccoon-heavy yards
If you live somewhere warm year-round (USDA zones 8+) and want your slider outside full-time, this is the build. A fully fenced ground-level enclosure with a dug-in pond section, a basking land area, and a locking lid.
Think of it as a turtle-only mini backyard. Pond on one side, planted dirt and rocks on the other, with shade from a small tree or shade cloth.
The enclosure walls go 12 inches into the ground (sliders dig) and 24 inches above ground (sliders also climb more than people think).
How to copy it:
- Frame a 6×4 foot or larger pen with cedar 2x6s or galvanized panels
- Bury the walls 12 inches down to block digging escapes
- Line a pond section with a preformed pond liner (my pick: 10x15 FT 20 Mil HDPE pond liner) or rigid plastic tub (50+ gallons)
- Slope the land area at least 2:1 so the turtle can walk in and out of the water
- Add hiding spots: a hollow log, a flipped clay pot, or rock piles
- Cover the entire top with hardware cloth on a hinged frame, latched
- Provide partial shade with a young tree, shade cloth, or large rock overhang
Raccoons, herons, foxes, and neighborhood cats all want to eat your turtle. The locking lid is non-negotiable, and so is checking the perimeter for chew-throughs every week.
For more on what wants to eat your slider, see our guide on common turtle predators.
This is a serious build, but if you’ve got the climate and the yard, your slider will live longer and healthier than any indoor setup can match.
Hybrid Indoor-Outdoor Setup
This last build crosses the line between aquarium and enclosure. It’s an indoor build, but the scale is closer to outdoor.
8. The Loft-Style Turtle Mansion
Great for: DIY lovers, indoor setups, serious turtle parents
This is a beast. Half aquarium, half playground, all turtle heaven.
You’ve got a large tub-style water section below, decorated with vines and driftwood, plus a multi-section land area above. Like a loft apartment for sliders.

There are grassy patches, hideouts, basking areas, and probably a whole neighborhood up there. The lighting is dialed in, and it even has LED strips for that chill vibe.
How to copy it:
- Use a large stock tank or kiddie pool as the base
- Build a sturdy wooden frame above the tank using 2x4s
- Create land areas with artificial turf, coconut fiber, or dirt. Add ramps for access
- Hang a heat lamp or two above the land sections
- Use a canister filter underneath to keep the water clean
Make sure it’s rated for 2 to 3x your actual water volume. Check our filtration recommendations for the best canister filters for large setups.
It’s a project, no doubt. But if you’ve got space and tools, your red-eared slider will be living better than most humans.
Best Plants for Red-Eared Slider Tanks
Live plants take any of the setups above from “decent” to “actually thriving.” They oxygenate the water, pull nitrates between water changes, and give your slider visual cover.
The catch: sliders eat soft, leafy plants and uproot anything buried. Pick tough species that can be anchored to driftwood or stones.
Plants that actually survive a slider:
- Java fern. Tough leaves, attached to driftwood, ignored by most sliders
- Anubias barteri and Anubias nana. Hardy, slow-growing, anchor to hardscape
- Hornwort. Fast-growing floater, great nitrate sponge, regrows after nibbling
- Water lettuce and frogbit. Floating cover, blocks excess light, gets eaten (that’s fine)
- Amazon sword. Larger leaves, plant in a weighted pot, replace as needed
- Java moss. Tied to rock or wood, fills gaps, sliders mostly leave it alone
Plants to avoid:
- Elodea (anacharis). Sliders treat it like salad. Gone in 48 hours
- Soft-leaf stem plants like Cabomba. Same problem
- Anything sold as “carpet plants.” They need bright light + CO2 and won’t survive turtle disturbance
For a deeper dive on plant selection, lighting, and what actually works long-term, read the truth about live plants in turtle tanks.
The Equipment You Actually Need (For Any of These Setups)
The habitat designs above are inspiring, but let’s talk about what makes them actually work. Here’s what every red-eared slider setup needs:
Filtration (The Most Important Investment)
Red-eared sliders are messy. Really messy. You need a canister filter rated for at least 2 to 3x your actual water volume. For a 55-gallon tank, that means a filter rated for 150+ gallons. Our filtration guide recommends the Fluval FX4 or FX6. These will last you 10+ years with proper care.
UVB Lighting (Non-Negotiable)
Without proper UVB, your slider cannot metabolize calcium. This leads to soft shell, metabolic bone disease, and eventually death.
You need a Zoo Med ReptiSun 10.0 T5 HO bulb mounted 10 to 12 inches above the basking area. Replace it every 6 to 12 months even if it still produces light. UVB output degrades over time. See our complete UVB setup guide.
Since a bulb can stop putting out useful rays long before it looks dead, log the install date and set a UVB replacement reminder in a turtle care app so a faded bulb never slips past you.
Heat Lamp
Your basking area needs to reach 88 to 92°F for red-eared sliders. A 75 to 100W basking bulb positioned 8 to 10 inches above the platform usually does the trick.
Use a ceramic socket (not plastic) and verify temperature with an infrared thermometer. Details in our basking equipment section.
Water Heater
Maintain water temperature at 75 to 78°F. Use a submersible heater (recommended: submersible aquarium heater) rated at 2.5 to 5 watts per gallon, and protect it from your slider (they will crack glass heaters).
Mount it behind filter intake/output pipes or use a heater guard. Our water heater recommendations cover the best options.
Water Treatment and Testing
Use Seachem Prime water conditioner (recommended: reptile water conditioner) for every water change. Test your water weekly with the API Freshwater Master Test Kit (ammonia and nitrite should always read 0). More details in our water treatment section.
Food and Supplements
Feed quality turtle pellets (my pick: Mazuri Aquatic Turtle Diet) (Mazuri or Zoo Med) and dust food with calcium + D3 supplement 2 to 3 times per week. Adult red-eared sliders need less protein than juveniles. Adjust diet accordingly. See our nutrition guide.
Complete Shopping List
Don’t want to piece this together yourself? Our Turtle Owner Essentials page has everything you need with specific product recommendations, sizing guides, and setup instructions.
Reality Check
These habitat setups can cost anywhere from $50 (kiddie pool structure) to $500 (loft mansion frame), but the equipment inside is what really matters. Budget $400 to 600 for quality filtration, lighting, heating, and supplies. Cheap equipment = sick turtle + expensive vet bills.
Red-Eared Slider Habitat Ideas: FAQs
How big should a red-eared slider habitat be?
Adult red-eared sliders need at least 55 gallons for males and 75 to 125 gallons for females.
Follow the 10-gallons-per-inch-of-shell-length rule. Hatchlings can start in a 20-gallon long but will outgrow it within a year.
Oversize whenever possible. More water volume means healthier turtles and easier filtration.
Indoor vs outdoor habitat: which is better for a red-eared slider?
Outdoor habitats win on natural sunlight, swim space, and behavior enrichment. Indoor tanks win on temperature control and predator safety.
If you live in USDA zones 8+ and have a fenced yard with shade, outdoor is the gold standard. In colder climates or apartments, an indoor tank with proper UVB is a strong substitute.
Many owners run both: indoor tank in winter, outdoor stock tank or enclosure in summer.
What’s the easiest red-eared slider habitat for beginners?
The minimalist driftwood tank (Setup #1) is the most beginner-friendly indoor option.
You need a 55+ gallon glass tank, sand substrate, stacked driftwood, floating plants, and a clip-on UVB and basking lamp.
For outdoor builds, the kiddie pool special (Setup #5) is the cheapest and quickest. Just limit it to warm weather unless you bring it indoors.
Can you keep a red-eared slider in a kiddie pool?
Yes. A hard-plastic kiddie pool works great, especially outdoors in warm months or on a balcony.
You still need the same equipment as a glass tank: UVB lighting, a basking spot, a heat lamp, a filter, and monitored water temperature.
Avoid inflatable pools. Turtle claws puncture them easily. Supervise outdoor setups for predators, escapes, and temperature swings.
Do red-eared sliders need plants in their habitat?
Plants aren’t required, but they help. Live plants oxygenate the water, pull nitrates, give visual cover, and reduce algae.
Stick to tough species like Java fern, Anubias, hornwort, and floating water lettuce. Skip anything soft-leaved (sliders eat it).
If you don’t want live plants, weighted artificial silk plants give the same visual cover with zero maintenance.
How much does a red-eared slider habitat setup cost?
Structure costs range from about $50 (DIY kiddie pool) to $500+ (custom loft-style mansion frame).
Equipment is where the real money goes. Budget $400 to 600 for a canister filter, UVB bulb, heat lamp, water heater, substrate, and supplements.
Cutting corners on filtration or UVB usually backfires in vet bills.
Do red-eared sliders need a filter and a water heater?
Yes to both.
A canister filter rated for 2 to 3x your water volume is non-negotiable because sliders are exceptionally messy. Even with strong filtration, expect water changes every 2 to 3 weeks.
Water temperature should stay at 75 to 80°F for adults and 78 to 82°F for hatchlings. A submersible water heater is required unless your room stays warm year-round.
Protect glass heaters with a guard or tuck them behind filter intake pipes. Sliders will crack unprotected glass.

About Author
Muntaseer Rahman started keeping pet turtles back in 2013. He also owns the largest Turtle & Tortoise Facebook community in Bangladesh. These days he is mostly active on Facebook.