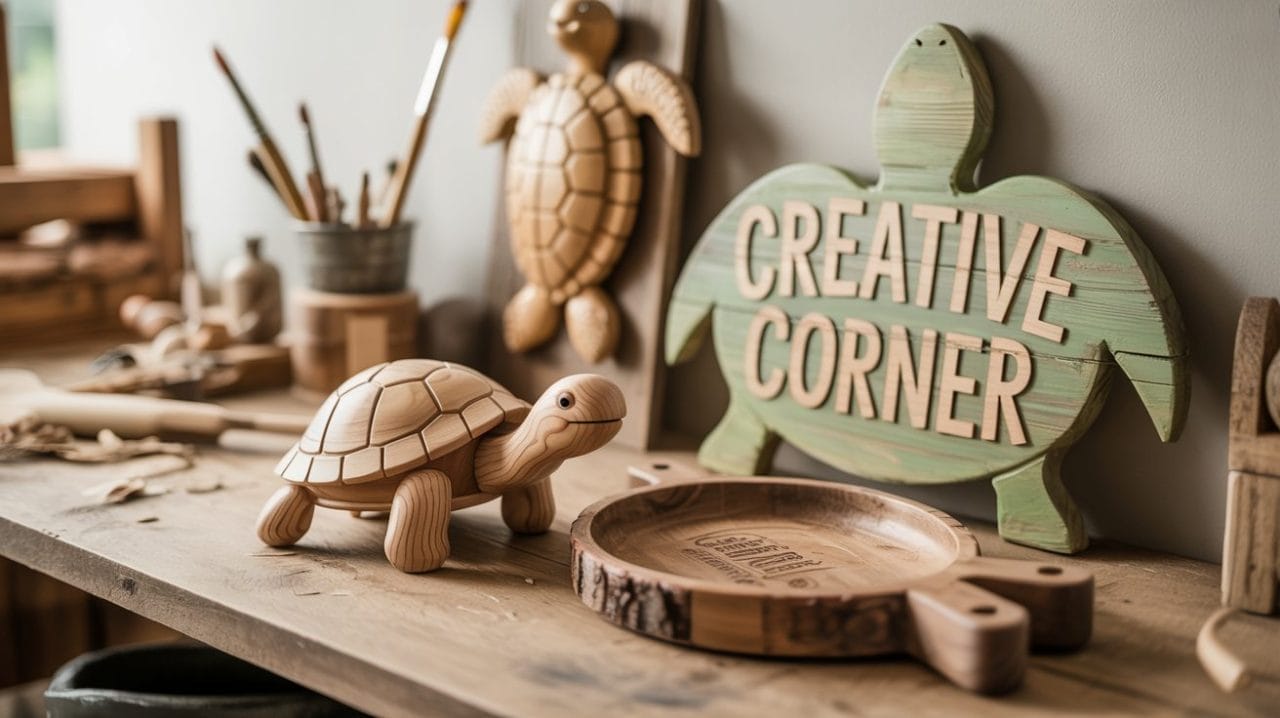
10 Wooden Turtle Crafts That’ll Make You Want to Grab a Saw
This post was created with help from AI tools and carefully reviewed by a human (Muntaseer Rahman). For more on how we use AI on this site, check out our Editorial Policy.
There’s just something about turtles that makes every craft ten times cuter. And when you mix that with wood? You’ve got a winning combo.
I’ve rounded up 10 wooden turtle crafts that are easy to make, look amazing, and don’t need a fancy workshop.
Some are beginner-friendly. Some will push your skills a bit. All of them are worth trying if you’ve got a saw, some wood, and a soft spot for turtles.

1. Painted Wooden Sea Turtle Wall Art
This one’s perfect if you want something bright, bold, and beachy on your wall. It’s basically a wooden cutout shaped like a sea turtle, painted however you like—realistic, tropical, or totally wild.
Materials Needed:
- Wooden sea turtle cutout (store-bought or DIY with a jigsaw)
- Sandpaper (medium and fine grit)
- Acrylic paints (greens, blues, whites, or your choice)
- Paintbrushes (one thick, one fine)
- Clear sealant (matte or glossy, your call)
- Hanging hardware (or command strips)
Steps:
- Sand the wood – Smooth the surface and edges so the paint sticks better and there are no splinters.
- Sketch your design (optional) – Lightly pencil in patterns or just freestyle it.
- Paint the base coat – A solid color underneath makes everything pop. Let it dry.
- Add details – Use your fine brush for spots, shell patterns, eyes, etc.
- Seal it up – Once dry, brush on a clear sealant to protect your artwork.
- Add hardware – Screw in a hook or stick on mounting strips. Done.
This piece works great in beach-style homes, turtle-themed rooms, or even your bathroom.
I’m gonna let you in on something most folks miss. There’s a page out there handing out 50 woodworking plans and a 440-page guidebook for free. No fluff. Just clean, step-by-step plans you can actually use—even if your saw wobbles a bit.
Don’t wait. They might pull it any day. Here’s the link.
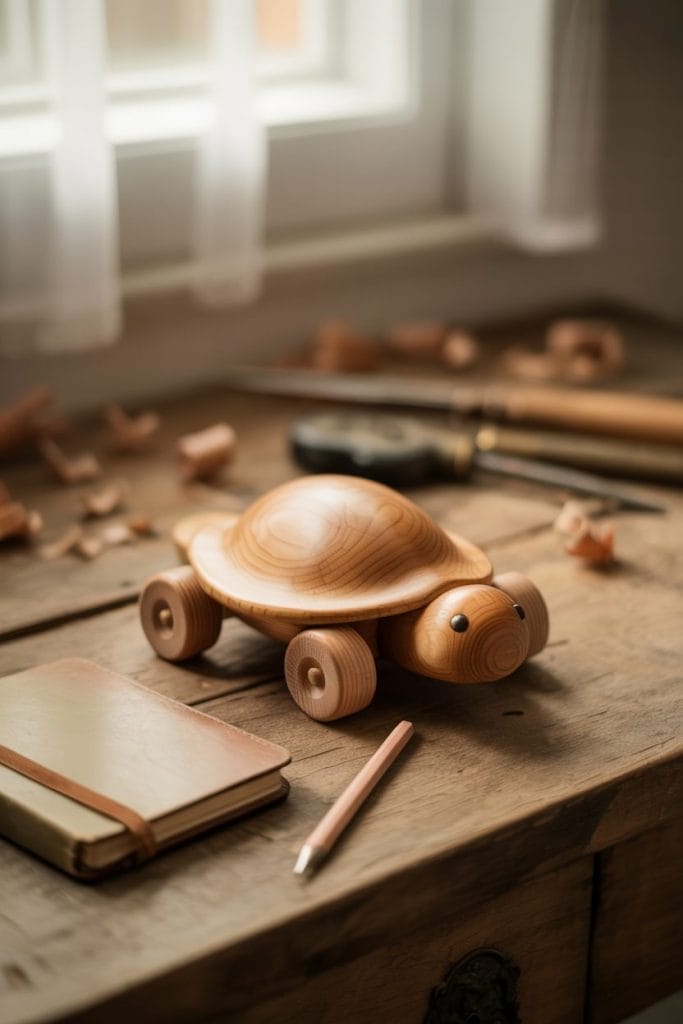
2. DIY Turtle Wooden Toy
This one’s a classic. A small wooden turtle toy that kids can play with—or adults can collect. You can keep it simple or make it fancy with movable parts like rolling wheels or a wiggly head.
Materials Needed:
- Small wooden board (½ inch thick is good)
- Turtle toy template (drawn or printed)
- Pencil
- Jigsaw or scroll saw
- Sandpaper
- Wood glue (if you’re adding parts)
- Non-toxic paint or wood stain
- Clear finish (child-safe if it’s for kids)
Steps:
- Trace your turtle shape onto the wood using a pencil and template.
- Cut the shape out carefully with a jigsaw or scroll saw.
- Sand all the edges smooth, especially the corners—no sharp bits allowed.
- If you want to add wheels, drill holes and attach small wooden wheels with glue or dowels.
- Paint it with safe acrylics or just stain it for a natural look.
- Let everything dry, then seal it with a safe clear finish.
This makes a great gift, especially when you personalize it with initials or a name.

This Hilarious Turtle Book Might Know Your Pet Better Than You Do

Let’s be real—most turtle care guides feel like reading a textbook written by a sleep-deprived zookeeper.
This one’s not that.
Told from the snarky point of view of a grumpy, judgmental turtle, 21 Turtle Truths You’ll Never Read in a Care Guide is packed with sarcasm, sass, and surprisingly useful insights.
And hey—you don’t have to commit to the whole thing just yet.
Grab 2 free truths from the ebook and get a taste of what your turtle really thinks about your setup, your food choices, and that weird plastic palm tree.
It’s funny, it’s honest, and if you’ve ever owned a turtle who glares at you like you’re the problem—you’ll feel seen.
3. Wooden Turtle sculpture
This one’s more about carving and shaping. You’re not building a toy or decor piece—you’re sculpting a turtle out of solid wood. It can be small enough to sit on a desk or big enough to be a centerpiece.
Materials Needed:
- A block of soft wood (like basswood or pine)
- Carving knife or rotary tool
- Sandpaper (various grits)
- Pencil for sketching
- Wood stain or paint (optional)
- Clear finish
Steps:
- Choose your block of wood based on the size you want.
- Sketch a rough turtle shape on the surface—shell, head, limbs.
- Start carving slowly with a basic knife or rotary tool, removing large chunks first.
- Once the shape is clear, focus on refining details like shell grooves, legs, and the head.
- Sand the sculpture thoroughly until smooth.
- Stain it for a natural look or paint it if you want something bolder.
- Finish with a clear coat to protect your work.
This one takes patience, but the result feels personal—like you really made something.
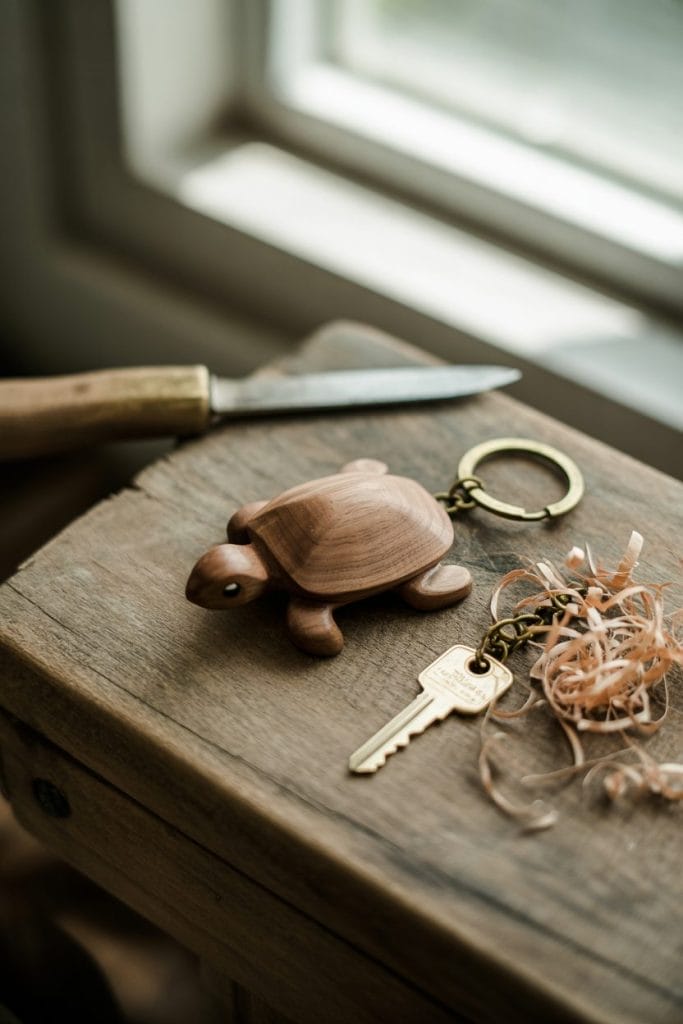
4. Wooden Turtle Keychain
Small, easy, and super giftable. A wooden turtle keychain is the kind of project you can knock out in under an hour—great for beginners or quick Etsy-style gifts.
Materials Needed:
- Thin wood sheet (¼ inch or less)
- Turtle outline template
- Pencil
- Scroll saw or coping saw
- Drill (for the keychain hole)
- Sandpaper
- Paint or wood stain
- Keychain ring and jump ring
- Clear finish
Steps:
- Trace a small turtle shape onto your wood sheet.
- Cut it out carefully with a scroll saw or coping saw.
- Drill a small hole near the top for the keychain ring.
- Sand the whole piece smooth, especially the edges.
- Stain or paint it depending on your style—natural or colorful.
- Seal with a clear coat to protect the finish.
- Add the keychain hardware using a jump ring.
You can make a bunch of these in one sitting. Great for party favors, small shop items, or just a custom charm for your own keys.
If you’re planning to sell crafts like this, having access to proper templates and sizing guides helps a lot.

5. Turtle Planter Made From Wood
If you like mixing plants with crafts, this one’s a fun twist—a wooden turtle-shaped planter that can sit on your porch, desk, or shelf. It’s a cute way to show off succulents or herbs.
Materials Needed:
- Wooden boards (¾ inch thick is good)
- Turtle planter template or sketch
- Pencil
- Jigsaw or scroll saw
- Wood glue and clamps
- Sandpaper
- Wood stain or paint
- Clear waterproof sealant
- Small plastic liner (optional, for real plants)
Steps:
- Draw or print a turtle shape with a rectangular hole in the center (this will hold the plant).
- Cut out the base shape and any separate parts like legs or head.
- Cut the plant-holding hole into the center using your saw.
- Attach the side parts with wood glue—clamp and let it dry fully.
- Sand all surfaces smooth, especially inside the plant hole.
- Stain or paint the whole thing based on your style.
- Seal with a waterproof coat if you’ll use real plants.
- Insert a plastic liner inside if you don’t want soil touching wood.
This craft makes a great housewarming gift or garden shelf piece.
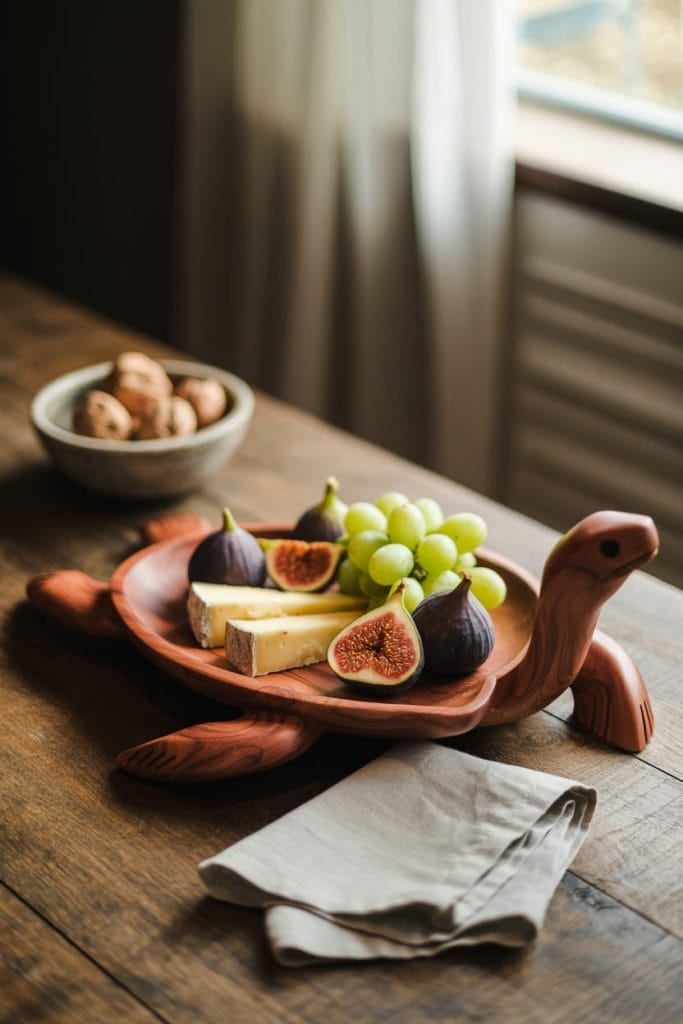
6. Turtle Tray or Serving Board
This is a simple but classy wooden tray shaped like a turtle. You can use it to serve snacks, hold keys, or just sit there looking good on a table.
Materials Needed:
- Hardwood board (like maple, cherry, or walnut)
- Turtle tray template
- Pencil
- Jigsaw or band saw
- Sandpaper (various grits)
- Wood conditioner (optional)
- Food-safe mineral oil or wood butter (if using for food)
Steps:
- Trace the turtle shape onto your hardwood board.
- Cut it out using a jigsaw or band saw. Keep the edges clean and smooth.
- Use a carving bit or chisel to gently scoop out the tray area (the shell). You don’t need to go deep—just enough for it to hold items.
- Sand everything thoroughly. Start with coarse grit and work your way up to fine.
- Wipe the wood clean and condition it if you want to bring out the grain.
- Finish with a food-safe oil if you’ll serve food on it, or regular wood finish if it’s decorative.
This project gives off a mix of handmade charm and polished style.

7. Carved Wooden Turtle Décor
This is a great project if you enjoy slow, detailed work. A carved wooden turtle can sit on a shelf, desk, or coffee table and bring a calm, earthy vibe to any space. You can go for a realistic look or something more stylized.
Materials Needed:
- Block of soft wood (like basswood or butternut)
- Carving knife or rotary tool
- Pencil
- Sandpaper
- Wood stain or paint (optional)
- Clear finish
Steps:
- Start by sketching your turtle on all sides of the wood block—top, side, and front views.
- Begin carving out the rough shape. Focus on getting the shell, head, and limbs in the right position.
- Slowly refine the details—shell patterns, eyes, legs, and facial features.
- Smooth everything with sandpaper once the shape looks right.
- Stain it if you want to bring out the wood grain, or paint it if you’re going for a bold look.
- Finish with a clear coat to protect it and give it a soft shine.
This kind of decor feels peaceful and handmade. It’s also a good project to improve your carving skills without too much pressure.

8. Wooden Turtle Bowl
A turtle bowl is a fun mix of carving and function. The shell acts as the bowl, and the head and legs give it that charming turtle look. It works great as a snack bowl, key holder, or just a centerpiece.
Materials Needed:
- Thick hardwood block or turning blank
- Carving tools or lathe (depending on your method)
- Sandpaper
- Wood stain or food-safe finish
- Pencil
Steps:
- Sketch a turtle from the top view, with the shell being the bowl area.
- Roughly cut out the shape with a saw or chisel.
- Start carving out the center of the shell to form the bowl. If you have a lathe, you can shape the bowl part first, then carve the turtle details after.
- Shape the head, legs, and tail with carving tools. Keep the details soft and rounded.
- Sand every surface until smooth.
- Stain or finish depending on how you’ll use it. Use a food-safe oil if snacks are going in it.
This one takes a little more work but stands out as both art and utility. It’s a solid weekend project that people notice.
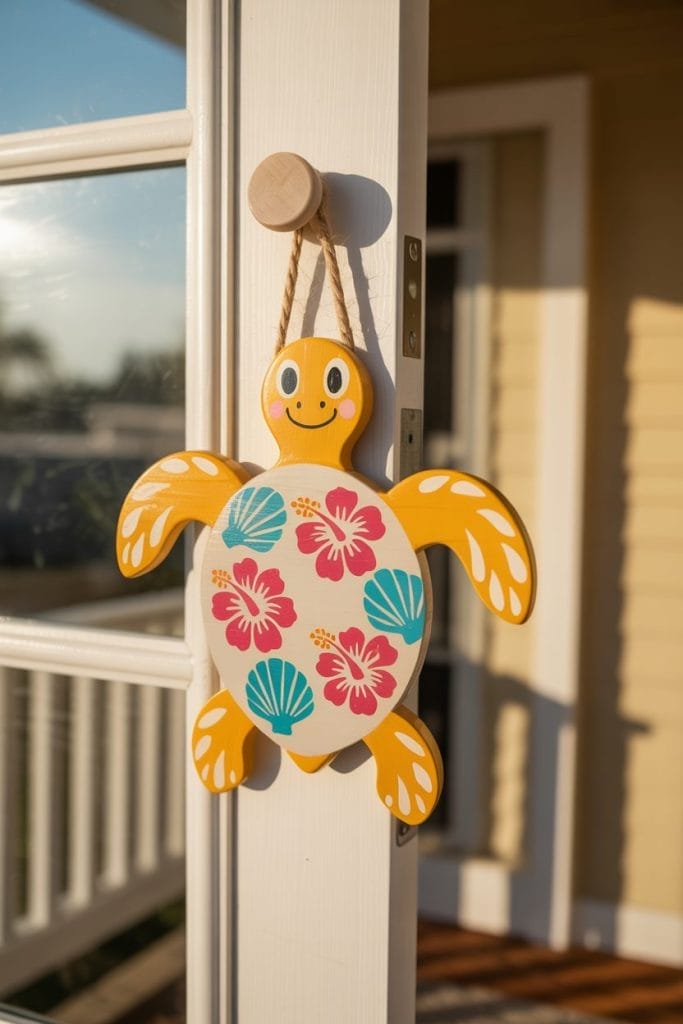
9. Wooden Turtle Door Hanger
A wooden turtle door hanger adds a fun, friendly touch to any front door or kid’s room. You can paint it to match the seasons or personalize it with names and messages.
Materials Needed:
- Thin plywood or MDF board (¼ inch works well)
- Turtle door hanger template or freehand sketch
- Pencil
- Jigsaw or scroll saw
- Sandpaper
- Acrylic paints
- Paintbrushes
- Clear outdoor sealant (if using outside)
- Twine, ribbon, or hanging hook
Steps:
- Trace the turtle shape onto your board, making sure it’s wide enough to be seen from a distance.
- Cut the shape out with a jigsaw or scroll saw.
- Sand the edges smooth and prep the surface for painting.
- Paint your design—go simple with colors or add words like “Welcome” or a family name.
- Let the paint dry, then seal it with a clear coat if it’s going on an exterior door.
- Attach a hook, ribbon, or twine at the top for hanging.
This craft is perfect for seasonal decorating or giving as a personalized gift. It’s easy to make and easy to switch up throughout the year.
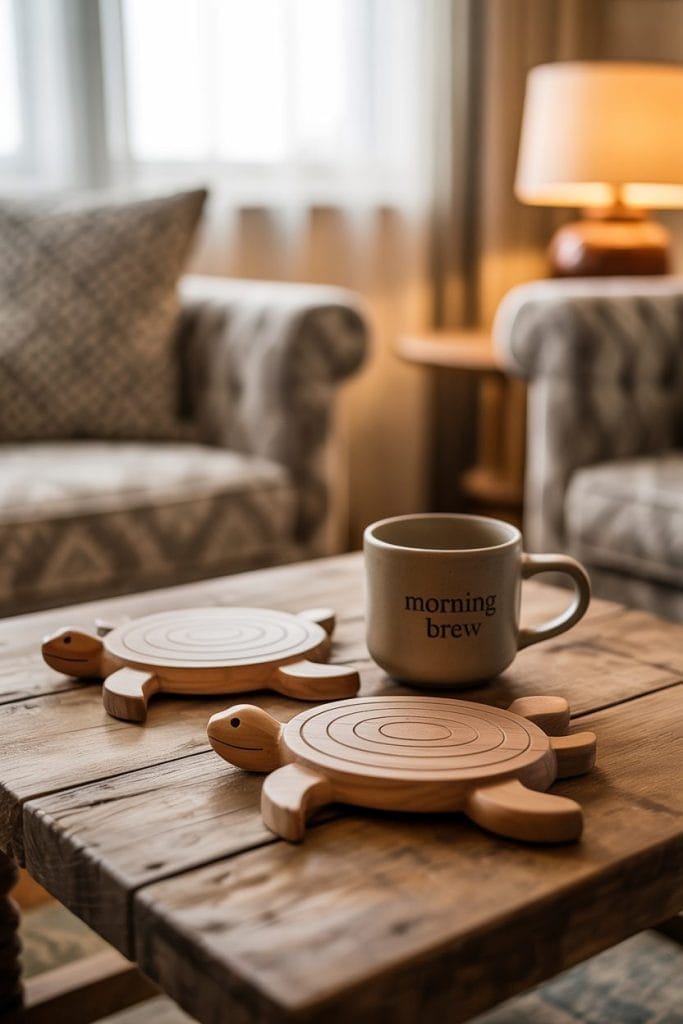
10. Wooden Turtle Coasters
These little guys are simple to make and super useful. Turtle-shaped coasters bring a fun twist to coffee tables, and they’re great for gifts or selling as sets.
Materials Needed:
- Thin wood sheet (about ¼ inch thick)
- Turtle-shaped stencil or template
- Pencil
- Scroll saw or coping saw
- Sandpaper
- Wood stain or paint
- Clear waterproof finish
Steps:
- Trace multiple turtle shapes onto the wood sheet using a stencil.
- Cut them out with a scroll saw or coping saw, keeping the edges as smooth as possible.
- Sand each coaster thoroughly—front, back, and all edges.
- Paint or stain them. You can go for natural wood tones or add fun colors and shell designs.
- Apply a waterproof sealant to protect them from moisture.
- Stack them into sets and tie them with string for gifting or storage.
You can keep the designs clean and modern or go wild with painted patterns—either way, these are quick, repeatable, and pretty addictive to make.

About Author
Muntaseer Rahman started keeping pet turtles back in 2013. He also owns the largest Turtle & Tortoise Facebook community in Bangladesh. These days he is mostly active on Facebook.